3. basic item equipment, avoid overlapping & swapping items
a.) Item can be equip from the inventory onto a character screen and vice versa
b.) Easy mechanics to avoid overlapping of items
c.) Swapping items
Article 3
3.a. basic item equipment
Before we continue please download the following application first. I added all of the objects that we need for this article and set their properties, this will save us some time on writing repetive stuff all over.
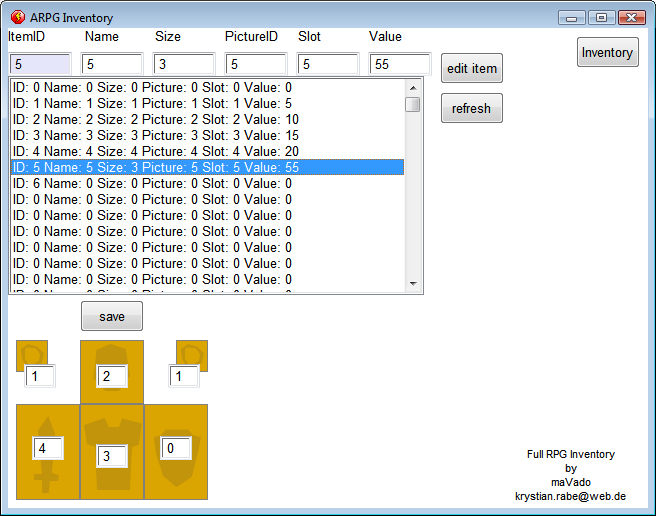
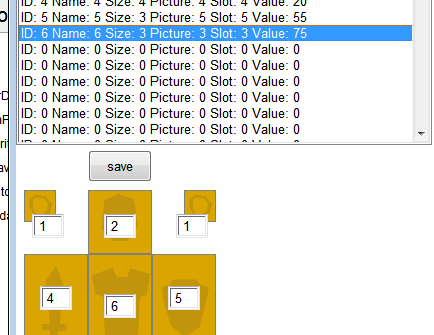
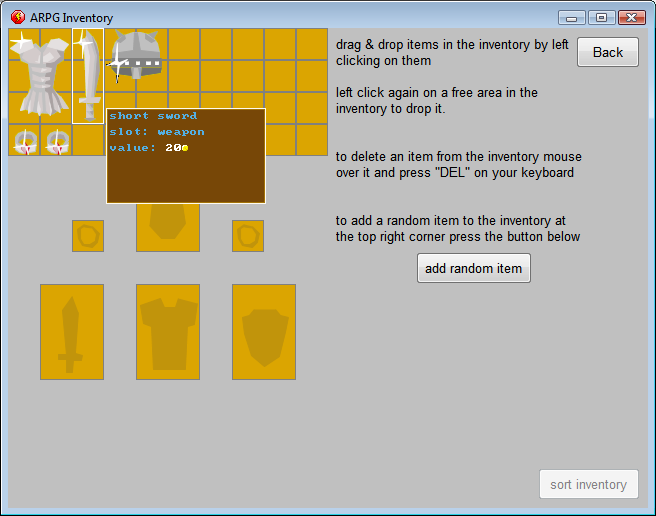
On the first frame you will notice a simple character editor. For the moment it will just hold our current equipment, nothing more. See Data subfolder for the actual file. Again this is an Array.
We will extend this later on another article. Also the item editor now allows row selection and editing.
On the second frame I added a Active object as background for our tooltip to make it look more solid, added a description and changed the background. Deleting items has been changed, to mouse over + DEL key. We are going to need the right mouse button later for quick equipment swapping!
Let's get started!
1. Our first goal will be to read the equipment from the character array and display it on the background. Copy the Array_CharDB Array object from frame 1, that holds the character information to frame 2. modify the start on frame event to clear and load the array from the same file as on frame 1.
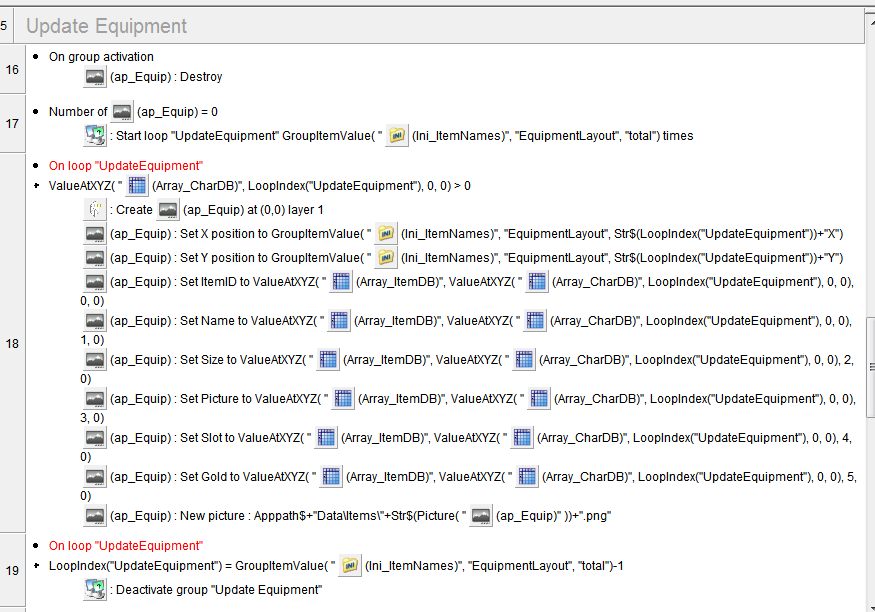
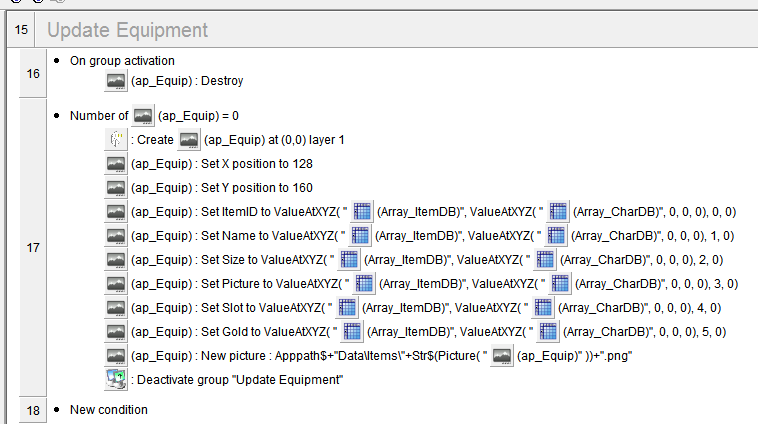
2.We are now going to create a new deactivated Update Equipment group and add a new global value UpdateEquipment. Add to the start of frame event that this group will be enabled. Duplicate one of the Active Picture objects to ap_Equip. Now start the application and change the character head value to 2 click save and close the application. Modify the Update Equipment group as following:
Start the application and you should now see the helmet on the head slot.
3. Open up the Itemnames.ini and add the following content to it and save it:
These are our XY origins of all the equipment slots in our bitmap, we need them as we do not want to position every equipment slot manually. We are smart and therefore use a loop Modify your Update Equipment group as seen below:
Start the application and check it out with different values in the character editor on frame 1.
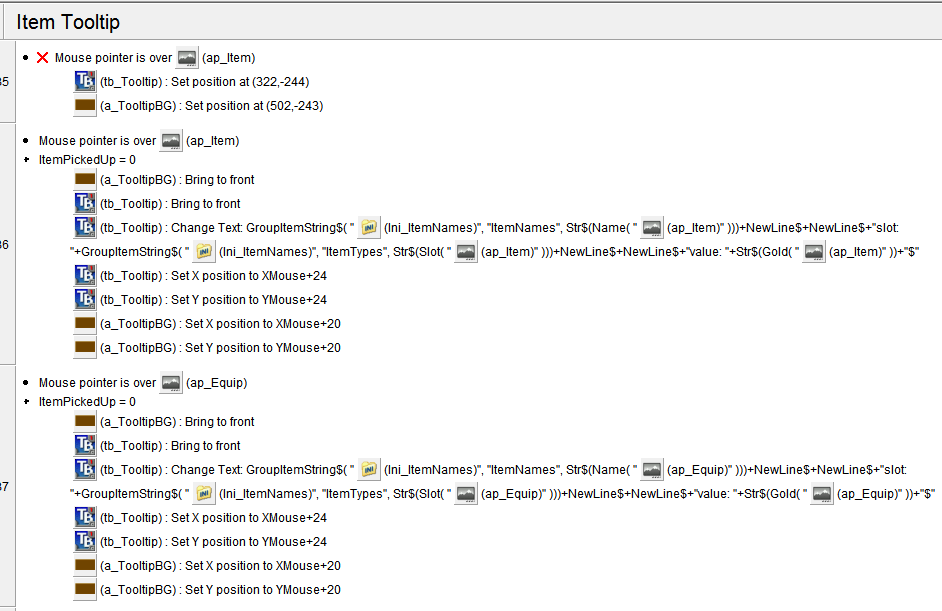
4. Tooltips would be nice, so we just modify the Item Tooltip group and adjust it to read from our ap_Equip objects. See below for the code:
Start the application and test it, make sure the negating event is on top of the group.
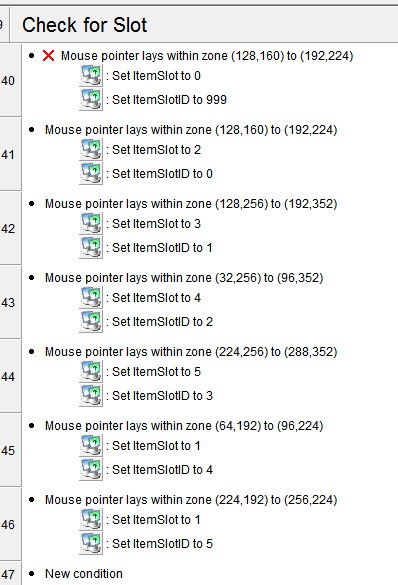
5. Add a new group Check for Slot and add a new global value ItemSlot. Add a second global value ItemSlotID with value 999. Add the following events to this group:
Check it out at runtime, mouseover those equipment fields and check in the Debugger window for the global value ItemSlot and ItemSlotID. We need those later to reference items so you can't equip armor items to ring slots for example.
Download the shield bitmap below and put it into your Data\Items subfolder. Add a new item to your item database that represents the shield and also modify the Itemnames.ini and add a name for the shield:
5=tower shield
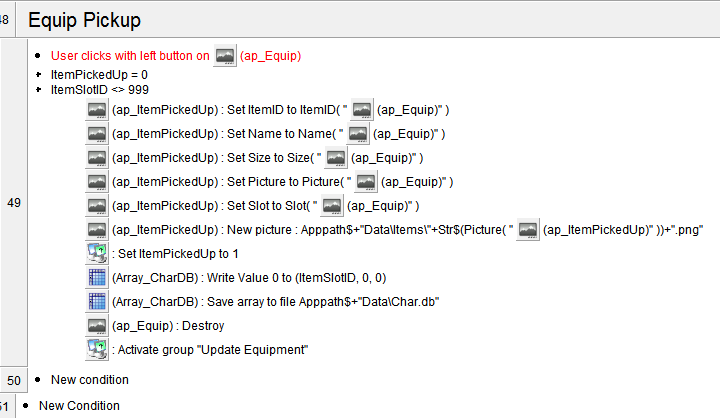
6. We start with item pick up from the equipment slots. In the character editor equip all slots including the shield. Create a new group Equip Pickup and add the following events:
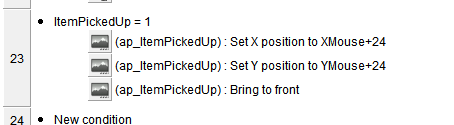
This is a basic copy of the inventory pick up code, so make a small modification to the original Pick Item Up group:
This will make sure the picked up item is always in front of everything else on that layer.
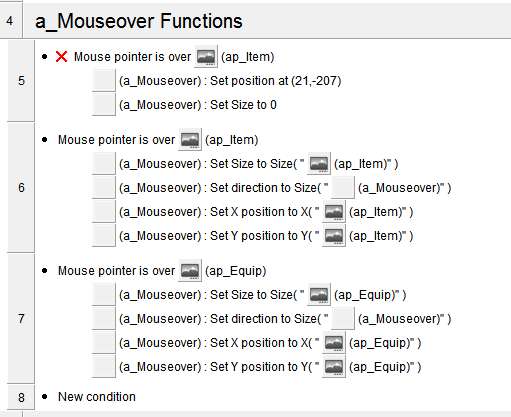
Also modify our a_Mouseover Functions as followed:
7. Now we want to equip items as well. There are two possibilities right now:
a.) If the equipment slot does not contain any item we want to drop the item into the slot.
b.) There is already an item in that slot so we want to swap it out picking up the other item and dropping the current one.
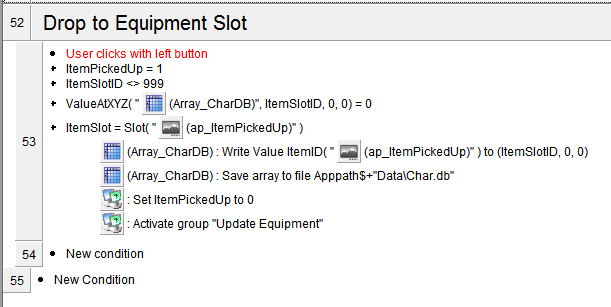
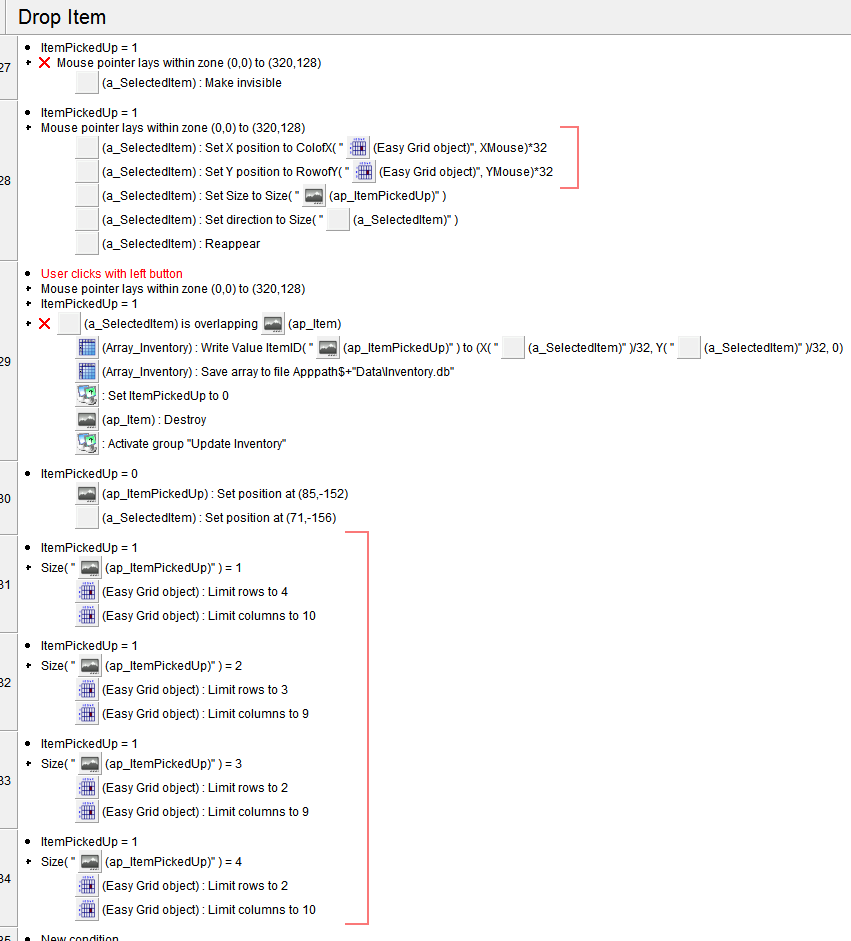
8. We start with possibility a.) first. Add a new group Drop to Equipment Slot and add the following content:
Here is how it works:
1. We check if an item is picked up.
2. We check if the ItemSlotID is not 999, so we are actually hovering above an equipment field.
3. Next we check our character array for that specific slot to be empty.
4. Now we do a comparison of the item slot value and compare it to our picked up item. If both match we write the picked up item id into the character array.
8. Let's continue with possibility b.). We need to make some adjustments first: To actually see that we swapped we need to first create a duplicate item in our item database with a different name and also maybe a different gold value. For this we add a new item at id 6. Open up our Itemnames.ini and add the following code:
6=novice armor
Also add the item to the item database and setup our character to wear it on the chest slot:
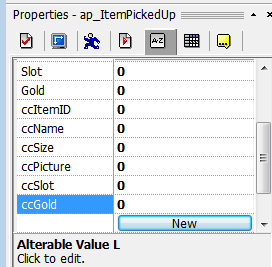
9. Swapping items means also that we need to swap values, therefore add another six alternate values to ap_ItemPickedUp. Name them as seen below:
Now we are good to go!
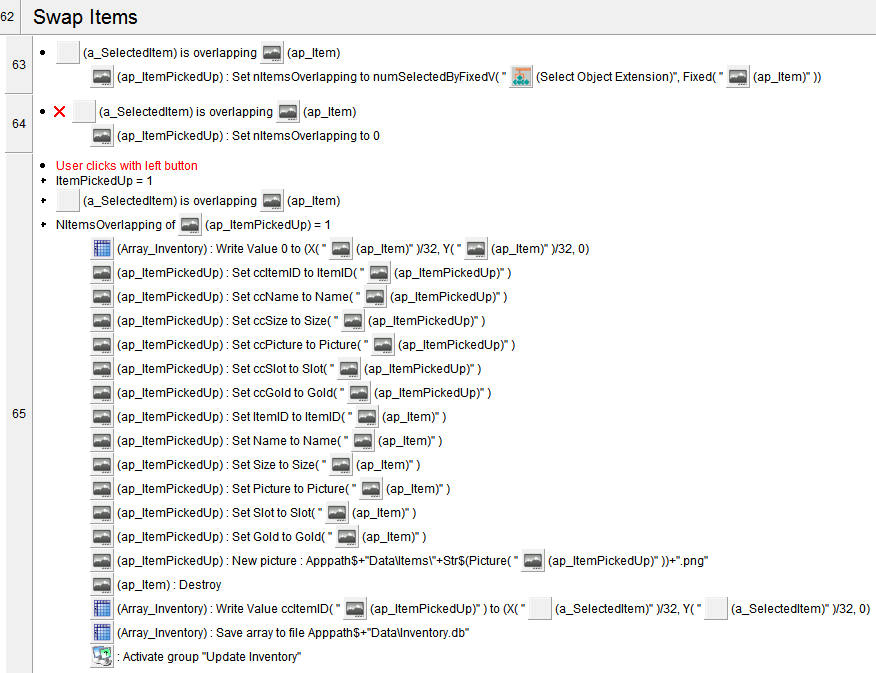
10. Add a new group Swap Equipment Slot and add the following code:
Also add the following code to load the picture on that event:
The pictures might not change for now but later it surely does.
Again wo almost do the same check but there are two differences this time. First we check for a click on the actual ap_Equip object. Second we check if that slot in our character array contains a value.
Now run the application and swap both armor types. Adjust the random item add function to be random(6)+1 so you have a chance on getting the new armor and shield on a random basis.
3.b. Avoid overlapping
This will be a short one as it is an easy fix. Edit the Easy Grid object and change the Y offset to 0. Then modify your Drop Item group:
Thanks to the Easy Grid object we can easily limit the boundaries for our intenvory grid.
3.c. swapping items
The most easy way would be just to swap items at their XY in the array. That would mean the following: A ring fits into a helmet and would be positioned top left corner of the helmet. A helmet fits into a piece of armor and also into a shield. Both shield and armor are perfect match. A sword would fit into armor and shield but not into a helmet or ring. A helmet obviously would not fit into a ring either. So there would be limitations.
Not a good solution at all!
So we need a few criterias to match for a bulletproof solution:
1.) We need to check if our item we want to drop does not overlap with more than one object!
2.) We need to drop the object at the actual selector mesh instead of the position of the item.
Let me explain: Our shield item takes up six cells in our inventory grid, 2X and 3Y in size. That would mean it could potentially hold up to six ring items. Let's image our player has a almost full inventory. In fact the last free slots are at the very right side of the inventory:
....OO


....XO


....OO


....XX
X means occupied by an item
O means empty
Now the player picks up a very valuable shield and he wants to keep it. The only way it works is by picking up the single X item in the middle and drop it into the free areas occupying all six of them. If he tries the row below it will not work because as we stated in 1.), it only works if we overlap a maximum of one item.
1. Add the Select Object Extension object into the second frame. Edit the alternate values of ap_ItemPickedUp and add a new one called nItemsOverlapping. We now use the Select Object Extension to get the number of objects our a_SelectedItem active is overlapping.
Check it out on the application
Wow you have come a long way!
This is actual ready to implement and play. A fully working inventory. Be sure the check the next articles on how to even improve this! Stay tuned!
(This includes all graphics, source and compiled exe as well this text and pictures, 1.1mb in total)
This will be the end of the second article. I hope you had the same fun recreating stuff like I did writing this for you, please leave some comments and or suggestions.

 Advertisement


 Modify your Update Equipment group as seen below: