This article will be a series of articles to teach you how to Setup an aRPG Inventory System used in to games like Diablo, Titan Quest and Sacred.
Target audience: advanced / experts & basic knowledge of the Action RPG genre
Key characteristics are:
- a grid based inventory area
- items in the inventory are snapped to the grid
- items may be of various height and width
- drag & drop interaction
- items are based in an item database
- database and graphics are stored externaly and are not hardcoded
- consumables like potions and spells
- ability to sort the inventory content
see below for examples taken from Diablo and Sacred 1
Table of Contents:
1. Item Database & Inventory Grid Setup
a.) Setup a basic item database to edit items
b.) Setup the grid, place items into your database and onto the grid and make them visual in your application
2. Item Pick and Drop & basic item information tooltip - http://www.create-games.com/article.asp?id=1998
a.) Pick items up and drop them anywhere in the inventory
b.) Display a basic mouse over information frame for your items
3. basic item equipment, avoid overlapping & and swapping items - http://www.create-games.com/article.asp?id=1999
a.) Item can be equip from the inventory onto a character screen and vice versa
b.) Easy mechanics to avoid overlapping of items and swapping items directly
4. Character stats introduction & Item bonuses - http://www.create-games.com/article.asp?id=2000
a.) Introduction to basic character statistics like: strenght, dexterity and similar
b.) Add and alter items to contain bonuses to increase or decrease character statistics
5. Consumables & Item classes - http://www.create-games.com/article.asp?id=2009
a.) Full introduction to consumables like postions, bandages and similar
b.) Items may be of different quality and or for different character classes like Warriors don't wear Robes and Mages can't hold a sword.
6. Expert Stuff!
a.) Durability and Item Modification like Sockets, Gems and Enchantments
b.) How to setup loot/droplists containing fixed or random items
c.) Sorting your Inventory
Article 1
1.a. Item Database
Let's start by explaining the mechanics behind the inventory: Your inventory is a simple 3D Array. Items in your inventory are referenced to a Item ID. Those IDs are stored into another array database which holds your inventory.
The array database for your items consists of various columns like:
ItemID - the actual ID of the item ; 0=no item
Name - an ID referenced to a name like Silver Dagger
Size - a value which defines the size of the item, 1 could be a Ring sized item which fits into a single cell, while 3 could be a chest sized item which needs 2x3 cells in total
PictureID - we store our items externally so we need to assign picture values
Slot - the slot in which this item fits into.
Value - the value of the item in gold ; just for the fun
Alright, let's get started:
1. Create a new application ARPG Inventory, 640x480 will do. Note: You might want to access the inventory in the actual game from a sub application later, so this size would be usefull.
2. Make two frames, the first will be our Item Database and the second one will be our Inventory.
3. Add two buttons to the first frame. b_Inventory, put an event on button click to jump to the second frame. Add a b_Back Button to the second frame to bring uns back to the first frame. Add a third button to the first frame called b_EditItem.
4. Add the Array Extension to the first frame, name it Array_ItemDB: X50, Y100, Z20 will be the settings, uncheck Base 1 index and make it Number based.
99% of the data will be values, only the name will be text, however we can just crosslink with an NameID to an Ini file for the actual name. So an item with the NameID 107 will be Silver Dagger of Speed for example.
Make a new directory on your harddrive and save the project into this folder. Make a subdirectory called Data and create a new Textfile named ItemNames.ini.
Add the following content to the file:
[ItemNames]


1=Ring


2=Helmet


3=Armor


4=Sword
Add the Ini object to the first frame and rename it to Ini_ItemNames. Add a Start of Frame event and load the ini from
Apppath$+Data\ItemNames.ini
5. Now we have the item database and reference set up we need some input fields to add items. Add 6 Edit Boxes to the first frame, name then EB_ItemID, EB_Name, EB_Size, EB_Picture, EB_Slot, EB_Value. Line them up as seen in the screenshot below and add a String object above them and type in some headlines.
Note: This is very basic, for a professional solution I suggest the Datagrid object or at least the Listview object.
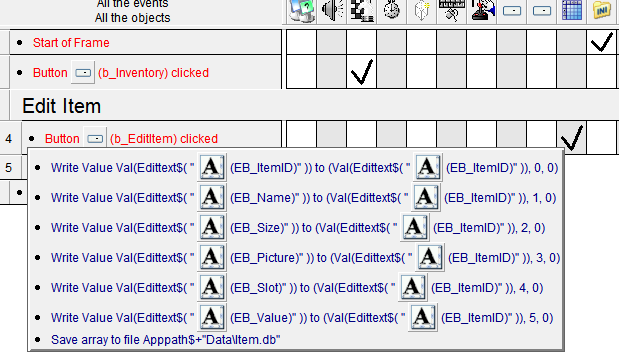
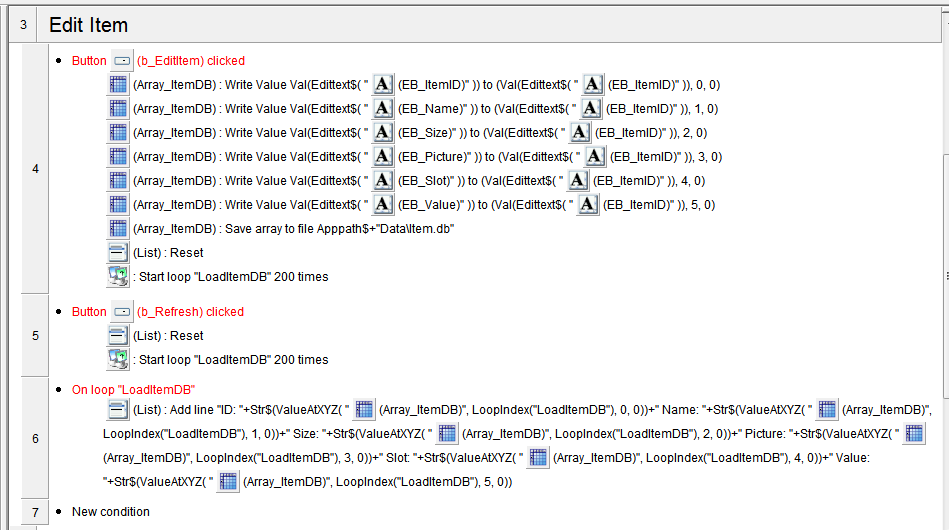
6. Go to the Event Editor and make a new Group Edit Item and add events to save all 6 edit boxes into the array. Use ED_ItemID as a Reference for X in the array. Save the array into the Same Data Subfolder name it Item.db. See screenshot below for the actual code:
7. Start the application and add one Item by typing 1 into all fields except the Value field. Make the value 5. Click on the Edit Item button and check in your explorer if the file was saved corrently. Should be around 400kb in size. Exit the application
8. Go back to the Event Editor and modify the Start on Frame Event and clear the array first then load the array from the same file. This will make sure we edit the same item database all the time and do not overwrite existing data.
9. Add a List object below the edit boxes and untick 1-based index. Make it large enough to cover the area below. Add the following events to load the array data into the list. Also add a second button named b_Refresh to manually refresh the list. See screenshot and code section below for the actual code:
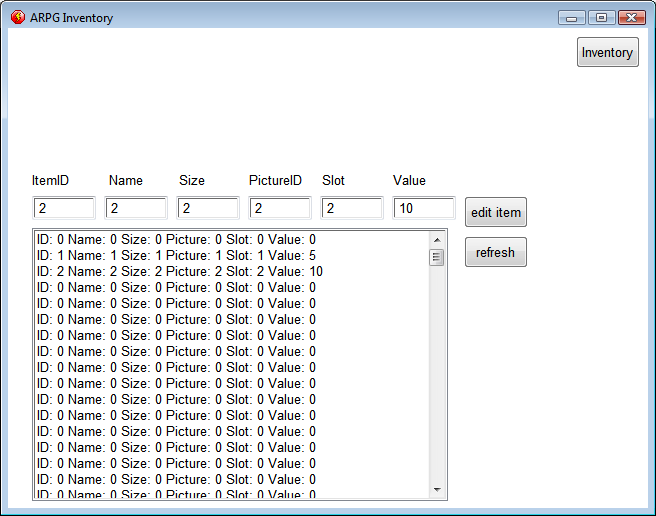
Start the application and add a second item to the database. Fill all fields with 2 except the value which is 10 this time.
It should now look like this:
10. We are done for the first part, our item database is set up and ready for use. This is very basic but enough for a the start.
1.b. Inventory Setup
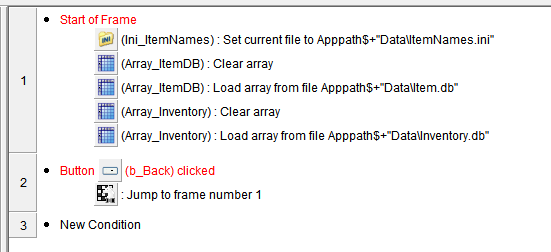
1. Switch to Frame 2. Add two Array objects, Array_Inventory, Array_ItemDB and one Ini object named Ini_ItemNames. Properly setup the Array_ItemDB to X50, Y100, Z20, 0-based and Numbers.
2. We will go with the same gridsizes as in Diablo 1. So array definitions for Array_Inventory are X10, Y4, Z20, 0-base, and Numbers.
3. Make both arrays and ini load their files on start. See screenshot below:
Please note that the Inventory.db file does not exist yet.
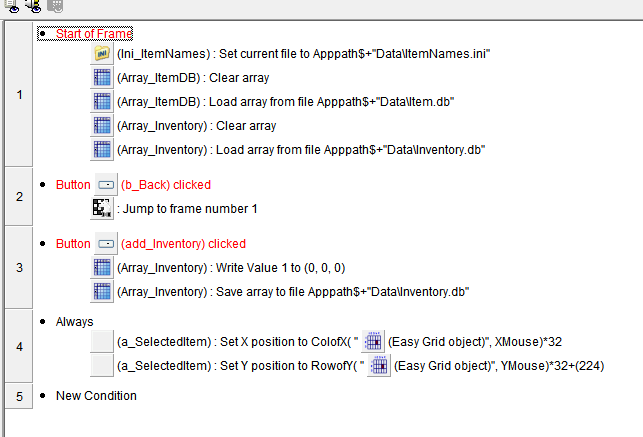
4. Add a new button b_AddItem, and on the on button click event write the value 1 to Array_Inventory to X0,Y0,Z0 and save the array to the inventory.db file in your Data directory.
5. Check the filesize of that file, it should be much smaller then our Item Database. Around 4kb.
6. We now have one Item stored at X0/Y0 in our Inventory.
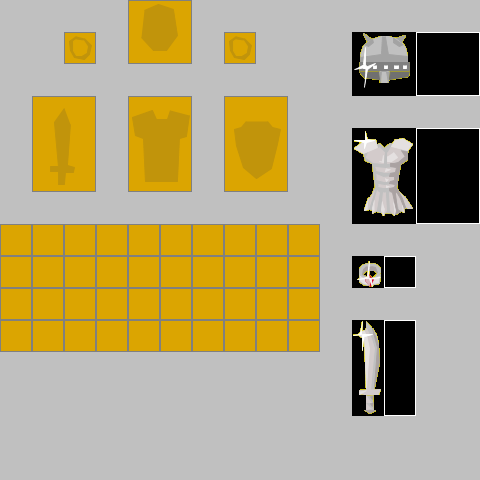
7. Now it's time to setup our interface and get some visual stuff done. Download the picture below:
Use the graphics program of your choice to do the following:
The sprites for the Ring, Helmet, Armor & Sword go into your Data\Items folder (make a new subfolder) as single bitmaps named 1-4.png. Make sure you get the pixel size right, the Ring is 32x32, the Helmet 64x64, Armor 64x96 and Sword 32x96. Make a black 32x32 bitmap and save it as 0.png.
The Meshes beside each item go all together into a single active object named a_SelectedItem. The Ring mesh goes into direction 1,Helmet to direction 2, Armor to direction 3 and Sword to direction 4. Remove direction 0 so default direction is 1.
Make sure the the black color is transparent for both the items and the active object animation.
The left part of the picture goes into a backdrop and placed at X0,Y0 on the frame. See screenshot below:
From now on the Ring mesh, 32x32 in size, is the smallest grid unit available in our inventory. In our Item.db array it will be referenced as Size=1. Helmet is Size=2, Armor Size=3 and Sword Size=4. Keep that in Mind.
8. Let's continue to setup the grid. Add the Easy Grid object into the second frame. Setup as 10x4 Grid, 32x32 as Cell size, X/Y offset is 0/224 pixels, that is the area where our inventory starts.
9. Now we want to snap the a_SelectedItem active to our grid based on our mouse x/y position. See screenshot below for the code:
10. Good. Now we can move the mouse around and have a selection object within our defined inventory grid.
11. Change the alternate value a of a_SelectedItem to Size and make it always look into the direction of Size
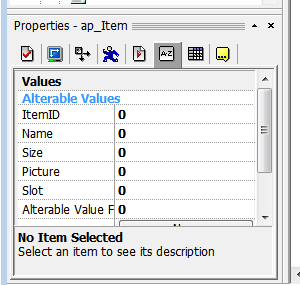
12. Add a Active Picture object to the frame. Name it ap_Item and setup some alt values as seen below, also setup to destroy to object on start.
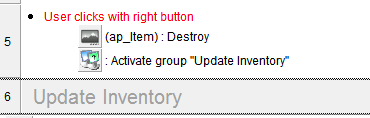
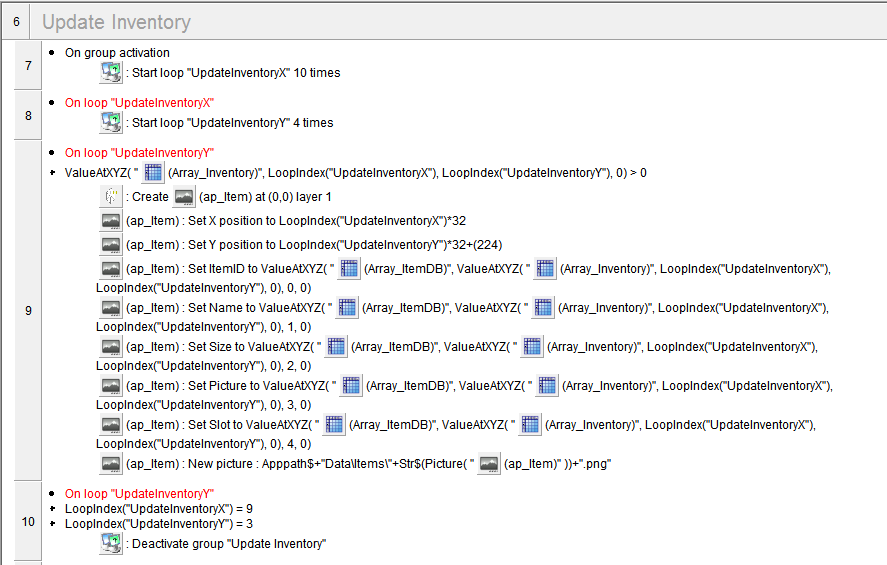
13. Now we draw the items from the inventory to the grid using fastloops and a disabled group that we enable whenever we need to redraw the inventory, see detailed code below:
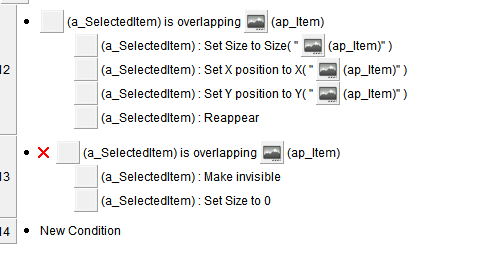
14. Also we want our meshes to match the action item so make the a_SelectedItem active to display the correct size for the item we hover our mouse over:
15. Now go back to step 1.b.4 and create two new items:
value 1 at x1,y1,z0 and value 2 at x3,y0,z0.
Press right mousebutton both times to see the actual update
(This includes all graphics, source and compiled exe as well this text and pictures, 800kb in total)
This will be the end for the first article. I hope you had the same fun recreating stuff like I did writing this for you, please leave some comments and or suggestions.
Thanks,
Krystian
Please note: this is the first of 6 articles, so far I have three articles ready. Also the file attached had a major bug in the mouse over which got fixed on article 2. If you want to try it out, check article 2 and download the link at the beginning of it. Thanks.

 Advertisement


 Please note: this is the first of 6 articles, so far I have three articles ready. Also the file attached had a major bug in the mouse over which got fixed on article 2. If you want to try it out, check article 2 and download the link at the beginning of it. Thanks.