2. Item Drag and Drop & basic item information tooltip
a.) Pick items up and drop them anywhere in the inventory
b.) Display a basic mouse over information frame for your items
Article 2
2.a. Item Pickup
Before we continue please download the following application first. I added all of the objects that we need for this article and set their properties, this will save us some time on writing repetive stuff all over.
You will notice that I changed the ordering in the inventory. I moved the inventory grid to 0,0 and removed the a_SelectedItem routine for good. I changed the fixed routine to create a item at runtime to be random whenever you click on the add item button. We will use this later for testing.
There is a new a_Mouseover Active object that snaps to an item once you mouseover one.
Also I cloned the ap_Item Active picture object into ap_ItemPickedUp. This will hold the picked up item and all it's information. The a_SelectedItem we used before will now help us to properly drop it on an empty field later.
I also added a new global value ItemPickedUp and let the inventory draw at frame start and when you add an item randomly to the inventory. No more right clicking for now.
This might look like a lot of changes I am not covering in this tutorial, but they are just minor adjustments check it fore a few minutes to get confortable with the changes.
Let's get started:
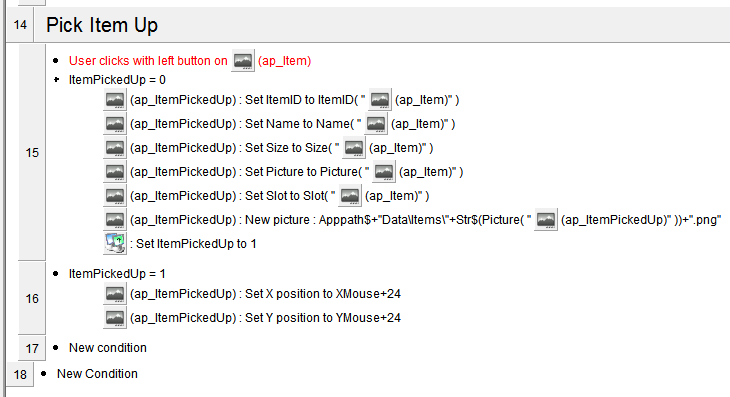
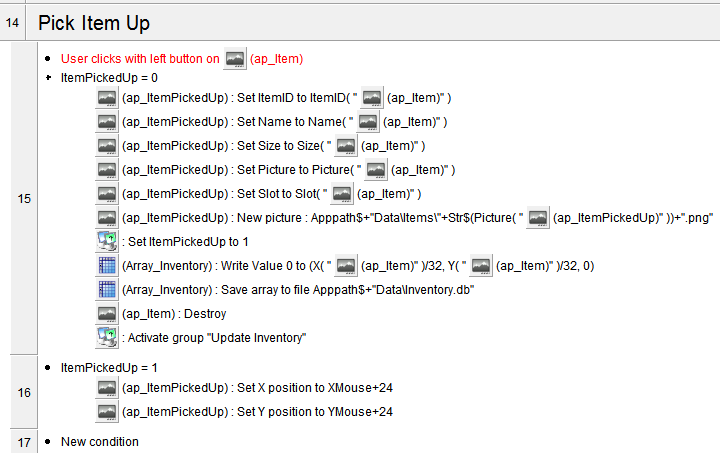
1. Our first goal will be to pickup an item. Create a new group Pick Item up and add the following code seen below:
This will position the X/Y of the ap_ItemPickedUp at the mouse once you click on an item, we use the global value ItemPickedUp as a Reference.
2. As you notice you can only pick up one item at a time. This is of course intended, but nowhere limited. You could pick up more items by adding additional ap_ItemPickedUp objects and increasing the global value. Just to give you an idea.
Fore the moment one item is what we will use so let's add a routine to drop the item onto the grid. Of course we don't want our item to drop onto another object and it should be within the limitation of our grid.
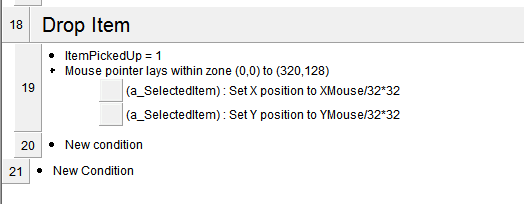
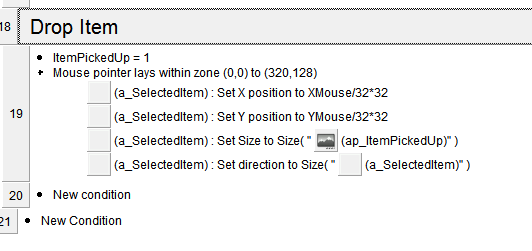
3. Create a new group Drop Item. We start by positioning our a_SelectedItem like seen in the code below:
4. Size matters therefore we need to add the correct size for the a_SelectedItem item, see below:
Start the application and pick up the Ring. Notice how the selection stays within the boundaries of our grid. This works great for items that are exactly 1 cell unit in size, like this Ring for example. Press F2 and pick up the Armor. Notice how it overlaps the bottom of the inventory?
In Article 3 we will fix this, but for the moment we just leave it as it is.
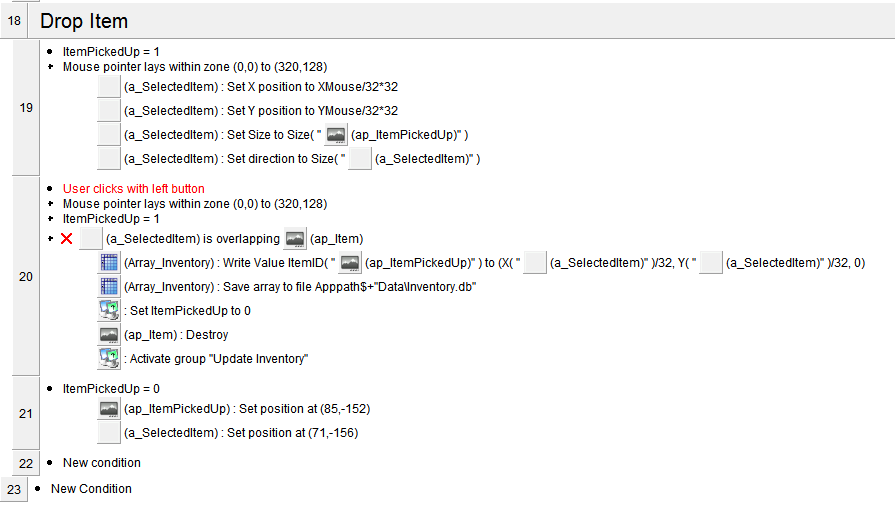
5. Now we want to drop the item. You might guess we just create an ap_Item at the a_SelectedItem position and copy over the ap_ItemPickedUp values. Well this would work but would be wasted resources as we draw our inventory from the array. Therefore we just write our values into the array and let the array draw the items for us. Add the following code to your Drop Item Code:
This will properly drop the item not overlapping another one and also make sure it's in the inventory boundaries.
Start the application and move a few item. Notice how you duplicate items all over the inventory?
*** So while I was laughing off at my end of the screen you got probably raided by a group of hardcore Diablo Fans who got mad and angry about that you just found out a way to duplicate items *joking*
6. It's obvious that we need to alter our pick up event to delete the item from the array database as soon as we pick it up. See code below:
That's it! Picking up items and dropping them works. I know you want to learn how to swap items or equip them onto your character, but that we will cover in another article Be patient!
7. Before we continue with the tooltip part we want to add a quick event to delete items from the inventory with simple right click on it, see code below:
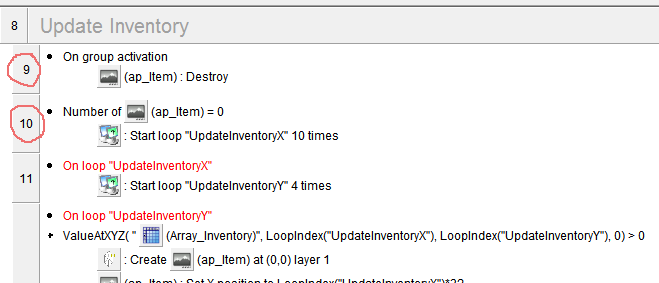
8. Now it's time for our first bug fixing. If you haven't noticed it before, the object count increases everytime we add a new item or move items around. Make the following modification to the Update Inventory Group and that problem is gone:
It should be fine now! Also check out the add item button to generate items after you deleted some of them
Before we continue make sure you have at least each type of item in the inventory, just hit the add item button a couple of times to get new items.
2.b. basic item information on mouse over
Now that we are able to move items around in our inventory it's time to show the player what he is actually moving around.
For this the best object available right now is the Text Blitter object. Text Blitter is very powerful, it can alter text and fonts at runtime, it's based on bitmaps so you can actually draw your own custom font and most importantly: characters like %$& for example could be turned into little bitmap icons.
Of course other objects in combination might work but for the moment I go with Text Blitter and you should too. If you are not familiar with the object I suggest you lookup some of the examples first.
Check out the Text Blitter object that I added to the frame. see how it displays the text in blue, numbers in white and that little gold icon behind 200? That's why I love Text Blitter
Let's get startet, this will be short but we will extend it in further articles!
1. Add the following events to make the Text Blitter object show the item information on mouse over:
This will display the ItemID value of the item on mouse over. Pretty simple 'eh?
2. Modifiy your Itemnames.ini file in the Data and fill in the code below:
[ItemNames]


1=brass ring


2=metal helmet


3=training armor


4=short sword


[ItemTypes]


1=jewelry


2=head


3=body


4=weapon
We added ItemTypes as a new reference.
3. Modify both Active Picture objects. The sixt value should be Gold and update the Update Inventory group to load the sixt value correctly!
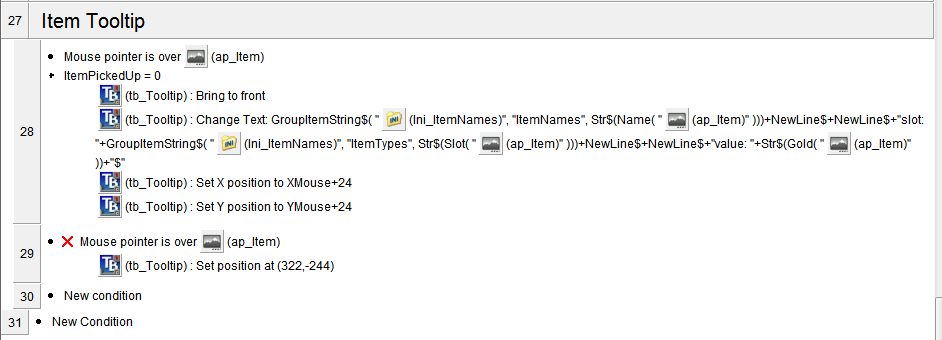
4. The player does not really want to see the ID. He cares for the name, what slot it's good for and what it's worth it in gold. He is a greedy person and might sell it later to a vendor ... See below for the code and screenshot:
(This includes all graphics, source and compiled exe as well this text and pictures, 800kb in total)
This will be the end of the second article. I hope you had the same fun recreating stuff like I did writing this for you, please leave some comments and or suggestions.

 Advertisement


 Be patient!